
This is a tutorial to get you started adding beads to your embroidery and other projects. It uses our Embellished Colorful Butterfly as an example.
You can download the Tutorial or read it below.
Tutorial for Beading Embroidery for Beginners
The purpose of this tutorial is to introduce you to beading an embroidered design. This could be on a garment, a picture or home décor items. I will be using the Butterfly from set BFC2000 to illustrate some ideas for adding beads to an embroidered design.

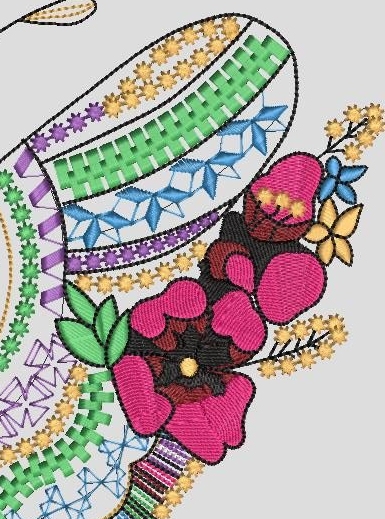
Below is the design without any beading. This type of design is good to start with because it has places easily defined as to where to put beads! An all over solid design is more difficult in two ways. Figuring out where to add beads and it might be difficult to get the needle through the more dense stitches. This doesn’t mean you can’t use solid designs, but if you’re new to beading, I think something like this butterfly is much easier to start with!
STEP ONE: GATHER YOUR MATERIALS
- Choose beads in an appropriate size for your design. I used the large design of the butterfly and mostly size 5/0 Japanese Seed Beads. This size bead is 4mm x 5 mm. To add dimension, I used 3/8 inch Czech crystals for the head and body. You can always use smaller size beads but remember the smaller the beads, the more you have to put on the design for them to show up! J If you’re starting out, stick to the larger beads like these. Here is a great chart showing the relative sizes of beads: https://www.allfreejewelrymaking.com/Jewelry-Basics/Bead-Size-Chart
Some places to get beads – thrift shops often have old clothes that have beads on them, old costume jewelry or look for multicolored offerings at bead sites or shops. https://www.firemountaingems.com/ is a fantastic source. Go there, click on beads and then on assortments.
- Beading Needle and Beading thread. Beading needles are long and fine with a long eye. Make sure your needle will go through your beads. You shouldn’t have any problems with the size listed above, but when you start getting smaller beads, the hole can get very small and require super thin needles. I would avoid these when starting out.
- Choose fabric that allows your needles to go through it smoothly. Some fabrics, like those with any vinyl or glittered surfaces or very dense fabrics can be difficult to get a needle through. Make life easier to make sure the needle slides through your fabric before starting your embroidery! Cottons and Linens are always good.
- The same principle I’m describing here can also be done with glue. I recommend E6000 glue. It does a great job of holding things together plus it has a narrow tip that allows you to put just a tiny bit of glue without making a mess.
STEP 2: PREPARE A PLACE TO GET STARTED
I can’t emphasize enough – BEADS ROLL EVERYWHERE! You can’t be too careful with them. I’ve been beading for a good 50 years. Yet – yesterday when I was getting beads for this project, I took a large vile of beads to see the color better and the cap was loose and beads went everywhere! They really bounce on vinyl flooring. A little extra caution can save a LOT of time in the long run.
So – I recommend using a tray of some sort to hold your beads while you work on the project. Another option is a tin of an appropriate size. You will need something to place some beads on so you can pick them up with your needle. Good options are a piece of felt, velvet, foam, anything that doesn’t allow them to roll easily When I was beading all the time, I took an old mouse pad (they were thick rubbery stuff back then) and put a bead of textured paint (the kind that left a 3D look). This was enough to contain the beads. They sell things for this, but I’m sure you will be able to find something you already have that will work.
I recommend if possible having a place you can keep the beads and your project together without them being disturbed. If this isn’t possible find a box to hold everything that you can put away out of harm’s way.
Now you have to go get a cup of coffee or tea and take a break! J
START BEADING
- Here is a diagram where I added beads. The dark red circles and the green circles are where I stitched the beads. These aren’t the only places, so feel free to experiment. And while working on a beading project it is always good to look at your project form a distance. You will be able to tell when things might be getting out of hand

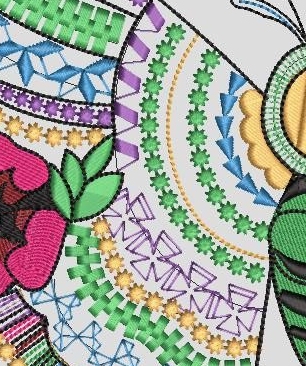
- Look at your design and decide where to start. Look for sections that give you a *guide*. I started with the blue decorative stitching because it had very defined places I could add a bead. Look at the picture below. There are three rectangles going across the blue stripe. This is where I will put the beads.
- Thread needle. I double the thread and tie a knot at the end. Bring your needle up from the back to the top side on one side of that little rectangle. Put a bead on your needle and put the needle back through the rectangle top to back. Bring the needle back up in the next rectangle and add another bead. After the third bead there are two options. If there will not be a backing on your project, neatly tie off your thread. If there will be a backing, you can just go onto the next bead being careful not to pull the thread too tight.
- I chose the purple run of stitches next.
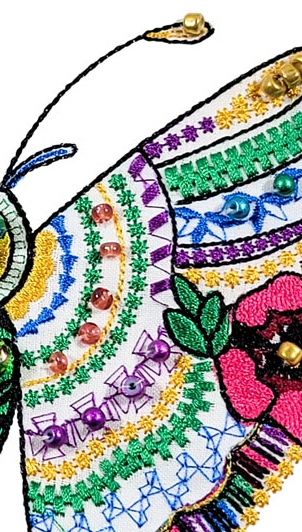
This time I chose the center of the crosses – so there will be 4 beads across. Repeat the blue and purple beads on the other side of the butterfly. Look at the picture above and you will see the third purple bead shows hole. I didn’t notice this while I was stitching, but I think I went through it twice (you can see the two white threads on the bead. It is worth taking the time to look well at each bead to make sure you won’t have to go back and fix as I will for this.
HINT: If I want to go back and fix that bead, I will probably have to do the entire row of beads because once I cut the thread, they will all come off. Here is a hint. Beads are usually glass and will break. BE VERY CAREFUL DOING THIS!!!!! Take pliers, hold the bead in the pliers and cover it with a cloth. Squeeze the pliers enough to break the bead. Remove the cloth and shake the design over a wastebasket. You have now eliminated that bead and can add a new bead in the same place. This may be difficult to do if you are using larger beads, but I’ve used this trick many times when making projects with lots of beads.
GOLD BEADS
Gold and other metallic beads always add a lot of Bling.
I started with the center of the big flower.
Using the same method, up through the back, put on bead, down to the back again, add your first gold bead. I next put one in between the two flowers at the intersection of the petals. The third was in the top petal above the gold candle-wicking stitches. Next I jumped to the gold and purple candle wicking. I started at the top of and inside the gold candle wicking. I brought the needle up, threaded 3 gold beads on my needle and went to the back
NOTE: If you are using smaller beads than the 5/0 you can do several at a time. Come up through your fabric, thread 4 or 5 beads onto your needle and go back down through the fabric. When done with a row made up of several groups of beads, you can thread your needle back though all the beads, pulling them together a little.
I added gold beads to one of the antennae, a row of them on the outer side of the first green strip, in the flowers and on the candle wicking of gold and purple.
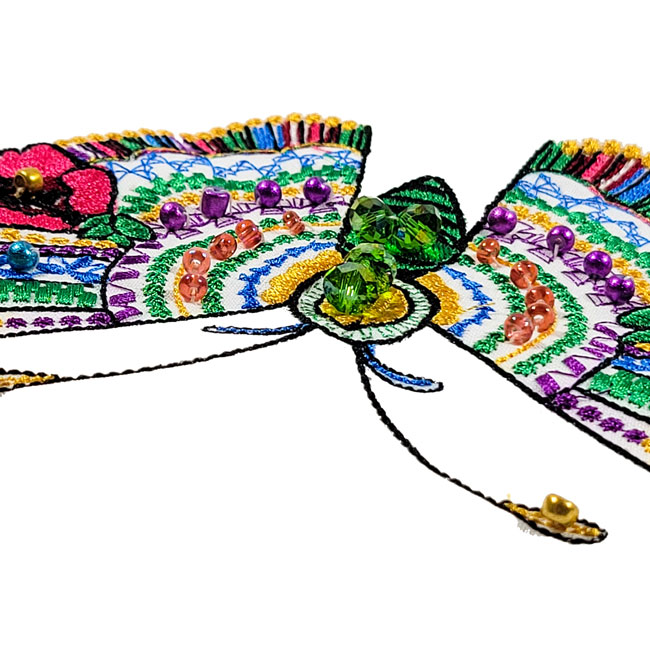
GREEN CRYSTALS
I added two of these to the body and two to the head. They are stitched the same but I go through the larger beads twice to make them more stable. These are quite large beads. Crystals come in many sizes from very tiny to very large. They can add a lot to a beaded design.
FINISHED DESIGN

Don’t hesitate to contact me if you have any questions – Suz Suz@BFC-Creations.com